This Old House

28 Aug

TOH Webshot

This spring I was contacted by the editors of This Old House Magazine about a possible feature of Ittybittybungalow in the September issue.

I’m thrilled to report that the house was shot this summer, then an  article was written and included in this month’s edition of This Old House Magazine. All of the images from the magazine can be seen here and the write up can be read here. In addition, if you so happen to like any of the items you see in the photos you can head over to Wayfair.com where you can purchase similar items (this is very cool, but also very weird, I must admit).

The article is well written and kinda funny. Essentially, for the first three paragraphs my parents make fun of me – so enjoy. I can’t tell you how shocked I was at how seriously the staff at This Old House take their job. The writer, Deborah Baldwin and I spoke over the phone for several sessions and for nearly and hour each time. In addition, a fact checker confirmed every detail with me after the article was written as well as confirmed every measurement on the floor plan.

The photo shoot took two days and was done by the same folks who had worked with me in the past for the Small Room Decorating article. Gridley and Graves did a phenomenal job making my house look better in the photos than it actually does in real life. It was fun to have a fresh look at a place you know well through the eyes of another.

As a kid my family and I always watched the This Old House gang on TV during Sunday morning breakfast. It was so much fun watching the transformation of these homes, seeing the attention to detail as well as the respect given to their individual character and history. Having my home featured by This Old House feels so very confirming of the work that I have done on this house over the past few years and I feel so humbled to have been asked to share my home with their readers.

So now…. its pretty clear that I’ve been a little lax on the blog lately. To be honest, there is not much to share. I’ve done what I wanted with the house and gotten to a place where I feel comfortable with it. I’m proud of the work I have completed and I have learned a ton. I hope that this blog can severe as inspiration to others along a similar path. Unless my life circumstances change, I don’t really see further big renovation plans in the future here at the IBB.

Its for those reasons that I’ve decided to sign off, at least for now. I feel successful in accomplishing the goals that I set out to achieve with both the house and this blog, most of the time I enjoyed the journey here and I’m so very happy with the results. I think its time I enjoy what I’ve got.

All the best,

Brad

Winter Changes

7 Mar

Dare I say it… winter is wrapping up here in upstate New York and I finally got my first gas and electric bill with an actual read. Armed with new information I sat down and worked the numbers a little to determine how much the new furnace had saved me.

Knowing that I spend just over $1,200 last year in heating oil charges it was a huge relief to know that I paid a total of $604 in gas AND electric from September 24 until February 13. Take out the charges for electric and I am certainly spending less than half of what I was paying for oil. I only wish I had done this sooner.

Once that old furnace was hauled out of the basement I was left with an old oil tank in the basement. In order to get rid of it I posted in on Craigslist – you want it? come and get it: don’t mess up my house. After a little farting around with someone who showed up and had no idea what they were doing I dismissed them and re-posted. This time a little more informed about what the job entailed and was able to find a great guy who came and pumped out all the remaining oil and hauled away the tank. Once that was done I was able to clean out the corner and paint it nicely.

Now I have a much more efficient furnace and extra room in the basement too.

tank

Besides the furnace swap I did decide to build some new three-over-one storm windows for the front porch and pull out the other wooden ones I removed when I moved in.This keeps the snow off the floor and saves me from moving all the furniture into the garage. This in turn makes it easier for me to park inside during the winter. I’d say I’m pretty happy with how it turned out. Once the winter passes I’ll open the porch back up since these windows only clip in with hook & eye fasteners.

windows

Other than that I haven’t done much of anything around the house. I unlike many of my neighbors have been spared the wrath of the ice damming issues and icicles in general. Likely because the attic floor is well insulated.

As soon as the weather breaks I am looking forward to building a small field-stone retaining wall along the front of the house and considering doing a little repair work on the back patio. Other than that I’m taking it easy.

A New Furnace

26 Oct

At the end of last winter I declared that hell or high water there was no way I was going to go through another winter with oil heat.

While there was nothing wrong with the furnace, it was extremely costly to run. Using the furnace meant periodic deliveries of oil were pumped into a tank housed in my basement. Oil runs just under $4.00 a gallon and it would be delivered at a rate of  about 100 at gallons at a time. A typical bill would run me somewhere around $400 and come about three times a season. Add to that, I was on automatic fill. Which means that they used some formula at their office to determine when to come replenish my tank. When the day came, the surprise bills would be tucked inside my front door for me to find when I came home from work. When I ran the numbers, I added up all my bills from last winter and determined it cost me approximately $1,250 dollars to heat the house. I then did a little more math and figured it was costing me about $7 a day to heat my house from mid October to mid mid April. The house is 865 square feet and I was keeping the thermostat at 62 while I was away and sleeping and 65 when I was home. Oil heat is expensive.

In addition to being costly, the furnace wasn’t doing anyone any favors in terms of efficiency. Since it had no way to modulate, the furnace was either all on or off. Nothing in the middle. It was also over-sized for the house and had a cast iron core when needed to warm up entirely each time it kicked on before it could share any heat with the house.

The one positive that it did have was that it was a trusty steed. It always worked, was in good shape, solid as a rock and must have been one heck of a model when it was purchased back in the day.

However, the furnace had to go. End of story.

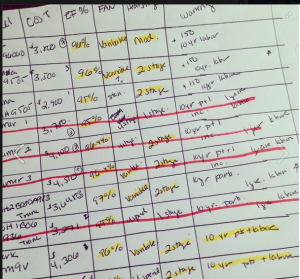
Over the summer I called about six different companies and got lots and lots of quotes on everything from fancy furnaces to no frills models. I made a big spreadsheet and decided to go middle of the road. I settled on a 97% efficient Trane gas furnace with a variable speed fan. It ran about $3,600 but, I got a 10% state rebate, which brought the cost down to about $3,200.

grid

As far as paying for it, I decided to use the NYSERDA program to get a free home energy audit in order to determine where to start. The fellow came out and ran a lot of tests and then came back another day to go over the findings. To be honest, I didn’t find the audit to be terribly revealing about anything I didn’t already know, nor did I really trust a lot of the math. Although they try to make the whole thing very scientific, I think there are a ton of variables which could easily sway the results. For instance, they did a blower door test to see how drafty my house was. The issue here was it was the middle of the summer and I had two AC units in the windows and none of the storm windows were in. So yeah, the blower door test was essentially saying my house was like a country barn. After the test the contractor came back out to go over the results and a list of recommendations with me.

Anyways, one of the benefits of the NYSERDA program was On Bill Recovery Financing and a 10% state rebate. With the On Bill Financing I was able to spread the cost of the furnace over five years and have it tacked on to my utility bill (which will add about $60). The advantage here is that the loan will follow the house, not me. So, if I decide to sell in less than five years the new owners will be responsible for whatever is left on the loan from the time of the sale out.

In addition to a new furnace I briefly considered having the house insulated with blown in cellulose as was suggested by the audit. However, I ultimately decided not to for a few reasons:

One: they would need to remove and replace the siding in a few places on the house. They could not guarantee that it would not be damaged.

Two: The return on investment would not be seen until at least five years from now. By then I hope to be in, or seriously thinking about a different house.

Three: There is already insulation in the attic, which is the most important place, many people online warned that since you could not install a vapor barrrier when blowing in cellulose it can become damp, trap moisture and even sink to the bottom of the wall cavity

Four: It would be nice to say the walls were insulated for resale, but really, very few of the houses in my neighborhood are and I really don’t think its something buyers would expect in this area or in a home of this age. I highly doubt, insulated walls would be enough to close a sale.

Five: This is a two bedroom starter house not a dream house.

OK, back to the furnace. The contractor came out and installed it last week and so far, so good. I have to say I was thrilled with the customer service and their attention to detail. They still have to come back out and do more testing to verify the energy savings that they promised, but I am sure everything is fine.

DSCN0664

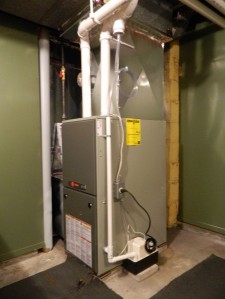
It is much smaller than the old one and much quieter. The only thing I think is a little strange is that they suggest running the fan all the time, not just when the heat kicks on. They say it keeps the house cleaner (here’s hoping it sucks up all the stray cat hair)  and more consistent I’m sure all of that is true. I’m just worried that its chewing up a lot of extra electric (they said only as much as a high efficiency light bulb left on all day and all night) and it’s blowing room temperature air around as you walk by the vents which actually feels a little cold. I’m wondering what others have to say about this.

Railing

27 Aug

DSCN0631


Hate to say it, but summer is wrapping up and as I got closer to the idea of school starting again I realized that I was going to have to start taking my To Do List a little bit more seriously. There were thee things on it that I had been putting off – add a flagstone retaining wall around the front flower beds, replace the furnace and change the railing on the front steps.

Knowing nothing about building a railing. I decided that building one would be the easiest (and cheapest) task to knock of. Believe it or not, I was right. I don’t even have a long story about all the things that went wrong or how I went insanely over budget. I even did it on one Saturday afternoon. Win.

There were some moderately tricky parts which I will outline below here:

Figuring out the angles was just a little slow, and I’m sure that there are fancy ways of doing it but I don’t really care. I just took whatever needed to be cut and used my miter saw to just trim a tiny bit off at a time until I found the cut that worked. It took a little extra time but I didn’t really mind. Turned out my spindles needed to be cut at about 35 degrees for anyone who might be wondering where a good starting point is.

I wasn’t really sure how railings were built. Thankfully, it was easy to find out. All I had to do is look around my street and there were all kinds of good (and bad) examples to consider. I then went to the hardware store and looked at the pieces and parts they had and kind of assembled it in my shopping cart based on what I saw on my street and what I knew I wanted it to look like.

The other part that was a little challenging was attaching the posts to the step. Most people lag bolt them into the sides of the steps. But that was not the look I was going for. So I was able to use a metal Strong Tie which I found at the hardware store to make the attachment. This way my post sits on  top of the step which I think looks more traditional. later I’ll cover the metal with some base moulding.

The last hard part was when I needed screw or toenail the railing tops and bottoms into the bottom post. It takes a little finess to get it right and done solidly since you are coming in from the bottom and the spindles (on the top) and the steps (on the bottom) are in  the way. At any rate, I did a mediocre job at this.

But you know what? It doesn’t really matter. You know why? Because the railing is totally solid and looks just like it has always been there (or it will, once I paint it).

DSCN0632


Fresh Blacktop

20 Jun


DSCN0613

So, I realize driveways are not exactly the most glamorous things to read about but I’m going to write about mine anyway. Aside from the fact that longtime readers will know that this driveway has been nothing short of a saga, it’s a been a real game changer for me. Coming home after work and pulling onto a flat, solid and tidy surface makes me feel much better about coming home. The first thought when I arrive home is no longer a reminder that I need to have this damn driveway paved. Its also a much nicer greeting to visitors in contrast to the faded, buckled and crumbling one I had before.

I had a hard time coming to grips with the fact that driveways are not DIY projects. I think in part to quell my fears, I had about 10 estimates done; which was about five more than I really needed. I talked to neighbors, checked references, made spreadsheets and found phone book coupons. In the end, I went with a local company who exceeded my expectations in professionalism and quality. They worked with me to solve an issue I had with drainage and worked incredibly neatly along my flower beds as well as in between the house and the fence, which I’m sure was no easy feat.

Do I wish it was done with stone, pavers or stamped concrete? Yes I do, but the return on investment was just not there. So, in the end it was a practical choice and I’m happy with it.

After it was all done I realized the walkway to my front porch looked like trash so I removed all the old pavers, rebuilt the base with new sand and stone and then laid them back down. I would have liked to replace the existing concrete pavers with brick or tumbled cobblestone, but I decided to use what I had. The more I thought about it I liked the contemporary twist that the larger, sleeker concrete pavers gave in juxtaposition to the house anyway.

DSCN0620


I did have to purchase a few new ones, that’s why some are brighter than others, but after a while I’m sure that the colors will bend. You might also notice the unpainted section on the steps. That’s there because when I replaced the pavers I had to remove the front steps and the railing that was attached to them. That railing needed to go eventually since it was an aluminum one that was likely done whenever they put the siding on the house. This summer I plan to fix that by  building a new wooden one in the Craftsman Style to suit the house. If you look closely you’ll see that this picture also is a good way to get a glimpse at the twin house next door built just one year prior to mine in 1929.

Both the new walk and the new driveway need to mellow out a bit and then I can seal the driveway and contemplate staining the concrete pavers down to a richer, less concrete-y color.

In the meantime, I’m going to start gathering ideas for that railing.

IBB Myth Busters Edition

23 May

I finished off the floors a few weeks ago and I ‘m happy with the way that the project turned out. During the process I was pleasantly surprised to find out a few of the things I thought were not true.

Myth one: Its expensive
It was really not that expensive and not as difficult as I thought it might be. The biggest expense in the whole project were the sanding pads and the polyurethane. I think I spent $400 total.

Myth Two: Its labor intensive:
I rented an orbital floor sander from Lowe’s and was able to do all four rooms and the hallway in one day. Most of the time I was just standing around holding the sander. As for the staining and poly. It was even easier.

Myth Three: Its dusty:
True, there was dust; but not nearly as much as I thought there would be. The sander really helped out a lot in this regard as it had a built in vacuum which sucked almost everything up. Including every elusive pine needle form the Christmas Trees of the last 75 years. 

Myth Four: Its stinky:
Ok, that one is true.

While doing the sanding I came to the conclusion that this is the first time my floors have ever been refinished. The boards were extremely uneven. It took a while to get every part of each board sanded down when some boards were lower than others. The floorboards are narrow and very thin, almost like yardsticks, and they are face nailed down to the subfloor.  I don’t think the floors were ever sanded down as a whole together. If they were there would be no way that they could have been so irregular. Is it possible that these were prefinished and then installed?

Once the finish was all off and I used all three grits of sandpaper, I stained the floors with a 50/50 mix of English Chestnut and Provincial stains. I did this because I wanted to go darker and I though that this mix looked best with the Gumwood baseboards. Speaking of the baseboards I also sanded the toe kick (because they were really beat up) on all of them and then applied a mix of Gunstock with a touch of Chestnut which matched the color of the rest of the Gumwood right on. 

Finally, I used three coats of water based poly to protect the floors. I suppose oil might have been better but the water based dries much faster and frankly, I needed my house back.


DSCN0520

DSCN0521

DSCN0523

PS. Guess who’s getting a new driveway today?

Preparing To Refinish The Floors

30 Mar

DSCN0517

In about two weeks I’m going to be ready to refinish my floors. I’ve left this project for the end because I ‘m not the neatest painter and for the first couple of years that I owned the house there was a lot of painting going on and furniture that was moving around. The floors don’t look too bad from far away but in person, there are many areas that are discolored, scratched, uneven or worn. Refinishing the floors is going to take a little gumption though since the entire house, aside form the kitchen and the bathroom contains hardwoods.

I know that there are lots of folks out there who have already been through this process so I’m looking for any tips or pieces of advice. Specifically in regard to the following:

Should I do half of the house at a time or the whole thing at once (remember I only have 860 sq. feet).
What about changing the color to a 50/50 mix of English Chestnut and Provincial wood stains?
Is Minwax the way to go?
What’s the best product to seal the floors with? Is it easy to work with? 
Just how much dust is this going to make? Is it worth the trouble to seal off the house with plastic?
What is the best way to apply the stain and sealer?

DSCN0518
I’m also wondering about what to do about these small gaps you can see in this picture. In two of the highest traffic areas of the house there are these small gaps in between a couple of the planks caused by wear. Can I fill these with wood putty, just ignore them, replace the entire plank? What’s the best thing to do here? 

And how about that shoe molding? It matches the Gumwood baseboard but its very worn in some spots, should this be sanded and re-shellacked? If so what’s the best way to do that?

Neighborhood Association

1 Mar

When I was house shopping, I never imagined that I was going to buy a house in the suburbs. However, here I am – three years later in the ‘burbs. I’m only a couple miles from the city line, heck  I could walk there if I wanted to and people who are more in shape than I am can, and do, run back and fourth but that’s not for me.It’s an inner-ring suburb so from the looks of it, you might guess my neighborhood was in the city anyways, the houses are close and there are lots of trees, we have sidewalks, street lamps and the houses are all old and each different. So it has a lot of the character of the city.Thankfully,  I know a lot of my neighbors. Mostly because I am nosey, really, really nosey; but I think that being nosey is a quality of a good neighbor. Anyways, I’ve decided to build a little community around these parts and see about meeting the rest of them. Or at least officially sanction my nosiness.

It all started about a month ago. I laid out a map and drew a circle around all the streets near me and then I made a flier. I stuffed fliers in each of the 700 doors inside the circle I drew. The flier stated that I was starting a neighborhood association and that we would be having a meeting in a few weeks. I was worried that nobody would show up. I made a nice little agenda, bought some tiny cookies and stood at the doors to the little church with big red doors that offered me a space to use.

DSCN0486

I waited…

and I waited…

and I waited…

It was dark and cold out so I had to keep blowing on my hands in order to keep them from freezing.

I suppose that when you go to a meeting in the dark, at a rather isolated little church, in response to a random flier stuck in your door its not exactly an event that you want to arrive early to. In fact, if it were me it might be something I’d try to arrive a few minutes late to and survey the activity at and then decide what I was going to do. But I guess that that’s not my neighbors. My neighbors came and they filled the little room in the little church with the big red doors. By the time the meeting was over we had almost 40 people inside. I was pretty flabbergasted.

So on Monday we’re going to have our second meeting and I feel hopeful about it.

Deadbeat Blogger

2 Feb

I have not posted in quite a while. The reality of the situation is that there really hasn’t been that much to talk about. After the kitchen was finished off this summer, school started and I was dead to the world for about two months while I worked feverishly to get back in the saddle in a new school and with a new content area. Then the holidays came and my focus was diverted again. Now that its January I thought I’d update and bring the blog readers (if there are any of you left) up to speed.

First and foremost, the magazine article I mentioned forever ago finally came out this fall. I was really thrilled with the exposure and felt really validated after all my toil on the house. It was photographed by Girdley & Graves and  published in the spring issue of Small Room Decorating and will be on stands until February, 24th so it’s not too late to get a copy.

DSCN0466

DSCN0467

DSCN0468

DSCN0469

In November I got a great deal on  beautiful Jenny Lind style bed for the spare bedroom at an antique shop nearby.

DSCN0460

And in December I tore open the attic floor and installed two light fixtures. One over my kitchen sink and another over the bathroom vanity.

DSCN0463

DSCN0464

And so that’s pretty much all that’s new. Exciting huh?

Truth is… I’m working on saving up for the driveway and want it done as  soon as the weather breaks the spring. So  a lot of frivolous house projects have taken a back seat. I am tired of talking about it, looking at it and trying to shovel snow off the uneven pavement. I’ve saved half of the money so far and am in a good position  to be ready by May. I should say though, that I’m not putting in crushed stone. I’m just going to pave it and be done with it.

There are a few pre-approved items which will be completed during the project freeze and those are refinishing the floors over Spring Break (myself) and once the driveway goes in I’m going to make some minor modifications to the short front walk and steps, mainly revolving around new pavers and replacing the short aluminum railing with a more appropriate wooden one. This fall I will also replace the oil furnace with a favorable financing deal from NYSERTA which is actually going to be saving me about $100.00 a month, rather immediately. Lastly, in the further off future I may look into finishing the attic in to a master bedroom and small second bath.

And that my friends, will be a wrap. I’ve got to stop tinkering and learn when it is appropriate to call it quits. I’ll be nearing the maximum return on investment value  at that point but with a healthy lead. Which might just lead to bigger and better things down the road.

I’ll also encourage you to follow along on Instagram at Ittybittybungalow


Kitchen Completion

17 Aug

DSCN0451


Alright! the big,giant, never-ending house project list is starting to wrap up. The latest item to be removed was the kitchen. Over the past couple of weeks I’ve spent a lot of time finishing out the space to be more like what I want, and to make it more functional. To start, I removed the old countertops which I had painted with the Rustoleum countertop paint and replaced them with butcher block which I stained and sealed. I knew I wanted them to be dark and I also knew I was never going to be cutting on them so I didn’t really care if they were food safe. The stain I used was Special Walnut and then I sealed them with several coats of oil based glossy poly. The countertops came from Lumber Liquidators and I got an eight foot section for about three hundred dollars, which was much more reasonable than a Granite or Soapstone remnant . As far as installation was concerned it was easy peasy. Thankfully, my Ikea Domsjo Sink was square and went the entire distance from the wall to the front of the countertop so I only had to make two cuts in the butcher block. I then placed it on the the counter top, leveled it, and screwed it in from the bottom with L brackets.

Here was the kitchen before, with the old doors, sink and countertop:
(it looks cute in that picture but I was very hard to keep clean)

kitchen


Next, I added the sink which just sort of dropped in and hung on the edges of the countertop. Once that was placed properly. I used compression fittings to add a dishwasher hook-up and then installed the new faucet. I really wanted to stay with a double handle but the sink only had one hole (it had places to drill more, but that seemed to risky) so I compromised on a single handle with pull out sprayer which is a little modern for my taste but it works well. I then added a garbage disposal.

That old sink might have looked good in that before photo, but here is how I looked most of the time:

Here is the new gaint sink:

DSCN0454

With the sink in working order I ventured on to the dishwasher. The dishwasher was the whole reason this project got started. I knew I needed a compact model but they were so expensive. They ran from about 400 dollars to anywhere near 700. So I happened to be trolling around Craigslist when I saw one about an hour away in Naples, NY. It was a better model than I was planning on purchasing and looked to be in good condition. Needless to say I was off for an afternoon road trip through the Finger Lakes wine country. When I got there I noticed it had a small dent in the front panel and the kickplate was missing, allowing me to talk them down from 100 dollars to 80. Sold. When I came home and installed it I called Sears and ordered the missing kickplate. I almost ordered a new front panel but when it was installed you could barley tell that there was a scratch so I figured I’d let it go for now.

DSCN0455

The last(ish) thing that I needed to do was sort out what I was going to do with the cabinet doors. I had gotten quotes for all new cabinets in the week prior. I needed about four cabinets, Two uppers and two lowers but no matter how I laid out the stock cabinet options I was loosing space or was not going to be able to center my sink on the window. Plus all the cabinets I was willing to buy were not as well built as my current, solid wood, 50’s custom numbers. So… I bought a table saw and with the help of Old Town Home and this old timer on YouTube built my own. Now I am not a woodworker and have zero skill in this area. I have to say aside from a few issues, the doors turned out great and I’m pretty happy with them.

DSCN0453


So with all this done, I’m in a pretty good house project position. I’d say we are leaving the renovation zone and headed into the maintenance/task zone and it feels great. The big projects that are left are to refinish my floors and do something about that driveway, and in the distant future change my furnace from oil to gas. And that’s it, even better is that only one project (the floors) is really a DIY job so I’m mostly off the hook.

Before I sign off, I have to mention that that yellow/gold color of my kitchen does not read well in any images I take.I’d say it looks most true in the second/before image and to be honest I’ve flirted with the idea of changing it to taupe several times. My main concern is that they yellow with the check floor reads too retro while I’m aiming for more of a vintage/classic look. I’d like some feed back on that so chime in.